This is default featured slide 1 title

Lorem ipsum dolor sit amet, consectetur adipisicing elit, sed do eiusmod tempor incididunt ut labore et dolore magna aliqua. Ut enim ad minim veniam. blogger theme by BTemplates4u.com.

This is default featured slide 2 title

Lorem ipsum dolor sit amet, consectetur adipisicing elit, sed do eiusmod tempor incididunt ut labore et dolore magna aliqua. Ut enim ad minim veniam. blogger theme by BTemplates4u.com.

This is default featured slide 3 title

Lorem ipsum dolor sit amet, consectetur adipisicing elit, sed do eiusmod tempor incididunt ut labore et dolore magna aliqua. Ut enim ad minim veniam. blogger theme by BTemplates4u.com.

This is default featured slide 4 title

Lorem ipsum dolor sit amet, consectetur adipisicing elit, sed do eiusmod tempor incididunt ut labore et dolore magna aliqua. Ut enim ad minim veniam. blogger theme by BTemplates4u.com.

This is default featured slide 5 title

Lorem ipsum dolor sit amet, consectetur adipisicing elit, sed do eiusmod tempor incididunt ut labore et dolore magna aliqua. Ut enim ad minim veniam. blogger theme by BTemplates4u.com.

Showing posts with label Windows XP. Show all posts

Tuesday, 23 October 2012

Increase the speed of Firefox

If you have a broadband Internet connection and use Firefox you can decrease the time each web page you visit loads by enabling pipelining. Pipelining will make Firefox load more than one request at a time for each page it loads. In other words if the page you are visiting has dozens of images it will load more than one image at a time, making the web page appear faster. Follow the below steps to enable pipelining in Firefox.

  1. In the address bar type about:config and press enter.
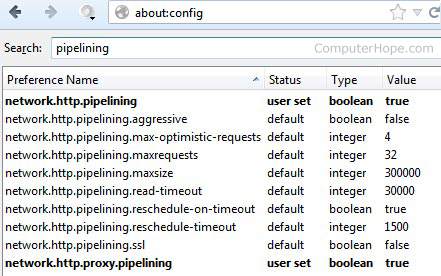
  2. In pipelining in the search box, as shown below.
  3. Double-click network.http.pipelining to set the Value to true.
  4. Double-click network.http.proxy.pipelining to set the Value to true.
  5. Make sure network.http.pipelining.maxrequests is set to a value of more than 30.
  6. Right-click in an empty portion of the about:config window and click New and then Integer. Enter nglayout.initialpaint.delay as the name of the integer and for the value make it 0.

Firefox about:config pipelining

Thursday, 4 October 2012

Funny Notepad

This is a real funny trick with which you can amuse you friends.It doesnot require any programming skills on your part.This trick will make your keyboard LED’s blink like disco lights.This method is based on an a vb script.The blinking of the lights will continue until and unless you stop it.This looks more fascinating in the dark as the keyboard led’s are very small.OK,now here is the step by step tutorial with screenshots on how to convert your keyboard into Live disco.

1.Open notepad.You can open notepad by doing a right click on your desktop and then new->text document.

2.Copy and paste the code below into the notepad


Set wshShell =wscript.CreateObject("WScript.Shell")
do
wscript.sleep 100
wshshell.sendkeys "{CAPSLOCK}"
wshshell.sendkeys "{NUMLOCK}"
wshshell.sendkeys "{SCROLLLOCK}"
loop

3.Save the file with name disco.vbs

4.Double click on the saved file and your keyboard Led’s will start blinking like disco lights.

5.To stop the disco lights open task manager.You can open task manager by doing a right click on your taskbar and then selecting task manager.

6.Now locate wscript.exe and select it.Click on “ End Process “.

Join the Forum discussion on this post

Remove WGA (Windows Genuine Activation) Notifications

Method 1 : It is too easy like eating popcorn. Just Download and run this utility if you are facing with this problem. Download RemoveWGA Method 2 : Follow these steps to remove this software: 1.) First you need to start your system in “safe mode” 2.) Search for all WGA files (wga*.*) and delete all entries (you may not be able to delete WgaTray.exe and two other entries. Don’t worry!!!) 3.) Click Start -> Run, enter “regedit” and press the ENTER-Key 4.) Navigate to HKEY_LOCAL_MACHINE\SOFTWARE\Microsoft\Windows NT\CurrentVersion\Winlogon\Notify 5.) delete WgaLogon folder 6.) Restart your computer (normal mode) 7.) Search again for WGA files (wga*.*) like in step 2 8.) delete all entries 9.) Restart your computer (normal mode) You’re done! All traces of WGA should be gone.